“An all-in-one toolkit to test desktop applications’ accessibility compliance.”
Introduction
This toolkit was born from the efforts of stabilizing the ArcGIS Pro, in order to making accessible design and development a more regular practice. I also published this on Medium, to start the conversation in the accessibility community and shed light on the need for process and tools in the Desktop application space. Below is the same article published in UX Collective.
My role:
Running a11y testing workshops
Creating testing guides and the toolkit
Reading time: 8 minutes
Desktop Applications and Accessibility
Before the world wide web, software applications were purchased from a store; they came with an instruction manual to help set up and use them, and a CD to insert and install onto the computer. While we have moved past the bulky boxes and learning manuals, these applications are still very relevant and have stood the the test of time in a mobile and web era. That is because they are robust, and are used to accomplish extremely complex tasks. They are widely used across the world — you probably use one too! Anything from Adobe’s Creative Suite or Microsoft Office are all great examples of software applications for the desktop.
“Compared to web or mobile apps, they are more complex, difficult to maintain, come at a higher cost, and are confined to a single machine.”

MS Word — a word processing, document designing and editing software application
While similar in principles to web, desktop accessibility has its own challenges. One major downside is that there’s not enough training or resources available to learn about it, and you have to find your way through all the rules and how to apply them in different settings. Another huge upset is that desktop accessibility testing is almost completely manual. Especially if you’re just starting out — the automation tests will come when you have a process in place.
“Desktop accessibility testing is done to meet the WCAG guidelines, as well as the Section 508 accessibility compliance standards.”
The Web Content Accessibility Guidelines (WCAG) are part of a series of web accessibility guidelines published by the Web Accessibility Initiative (WAI) of the World Wide Web Consortium (W3C), the main international standards organization for the Internet. They are a set of recommendations for making Web content more accessible, primarily for people with disabilities — but also for all user agents, including highly limited devices, such as mobile phones.
Section 508, a part of the 1998 amendment to the Rehabilitation Act, was enacted to eliminate barriers in information technology, to make available new opportunities for people with disabilities, and to encourage development of technologies that will help achieve these goals. The law applies to all Federal agencies when they develop, procure, maintain, or use electronic and information technology.
These guidelines are both similar and slightly different from one another, and adhering to both is necessary since there are no special recommendations for a desktop app, alone.
Approach to Accessibility Testing
Before we jump into the testing process, you have to understand how accessible applications should be designed and built. I’m not suggesting that you learn the development side of things (if that is not your background). If you know what the ideal scenario looks like, you can start testing to drive the changes towards that.
Start by unpacking the guidelines. It’s not easy to test the application against every single one of them in WCAG and Section 508 — it will take a long time, which is not always available. A good approach to testing for accessibility is prioritizing the key components and areas that need the most support. WCAG’s guidelines state that, “accessible applications should be perceivable, operable, understandable, and robust”. These can be boiled down to 4 main areas of support for your software:
Keyboard Navigation: Your application should be navigable by using just the keyboard, to support users with disabilities related to vision, motor skills, old age, injury, etc.
Screen Reader: Screen reader/screen magnifier are types of assistive technologies that read the content displayed on the screen. They helps users with vision-related disabilities to find content, and determine where they are.
High Contrast/Color Filters: To support people with vision-based disorders such as color blindness, the application should adapt and be operable under different display settings.
Text Alternatives: There should be alternate ways to understand the non-text content, such as in the form of large print, braille, speech, symbols or simpler language.
So, now you know what to test for…how do you start testing? What should be your biggest focus? Here’s a simple visual to help guide you through the testing process:
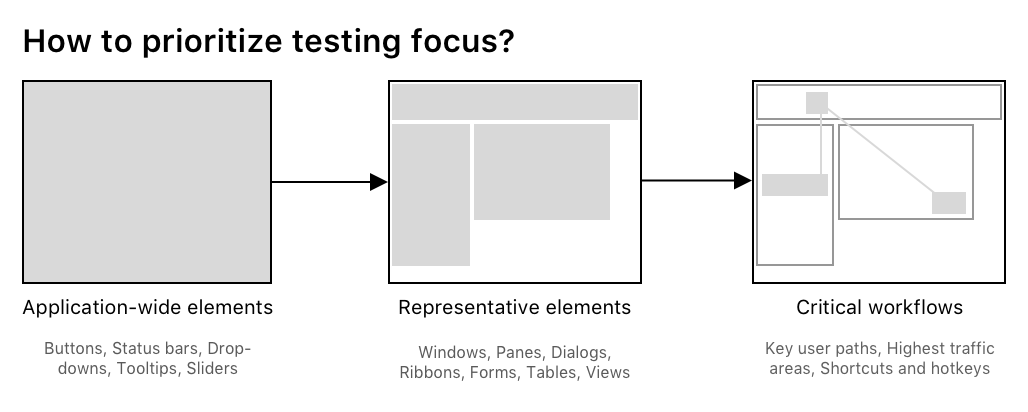
The priority of testing focus goes from application-wide elements to representative elements and finally critical workflows
Start by looking at application-wide elements such as buttons, combo boxes, etc. These are the UI elements that can be found everywhere in the app and would need the most attention if not accessible. Then move on to more focused areas or representative elements and look through each of their interactive elements (this would be dialogs, windows, tables, etc). Finally, go through the critical workflows and evaluate the accessibility as you do so.
Once you start walking through the numerous scenarios and looking at the application through the accessibility lens, you will discover patterns in the process and things will become much clearer — I promise!
The Accessibility Testing Toolkit
After teaching myself about desktop accessibility and auditing a product for 3–4 months, I started seeing trends in the application, and it suddenly became easier to conduct the audit. I began formulating these best practices for others to learn from. The ultimate goal was to make the product fully accessible, and this daunting task cannot be a 2 or 3-person job for a software with so many complexities. The only way to achieve this was to get all hands on deck, educate the developers, product engineers, product owners, about how to test for accessibility and complete the job together.

Holistic Testing with all types of members in the development team — product engineers, designers, QA testers, developers
We approached accessibility testing and education in a few different ways:
Accessibility-themed brown bags and presentations for internal stakeholders.
Hosting accessibility holistic testing sessions in every sprint of the release cycle. This included creating guides, supporting testers using these guides, and reporting accessibility defects back to the development team.
Generating content on processes and best practices, and socializing it through the design team’s wiki.
And finally,
Creating an all-purpose, concise “toolkit” as a culmination of all the efforts and content that had been created by us.

The toolkit was a culmination of all the efforts and content that had been created for the accessibility program. This would help making the testing process a more regular occurrence; now anyone pick up the task, carry out some quick tests and report/implement changes — regardless of their role in the org. And of course, the bundle of cards and guides made the whole process a little less daunting, and a lot more playful!
“This toolkit is also scalable, which means anyone supporting accessibility testing for their company can adapt this to suit their needs.”
Toolkit Features and Testing Process
It is a PDF document that lives on the company’s cloud drive, so that it can be easily shared with teams across the org. The best part about the on-screen toolkit is its interactive components, so users have the satisfaction of logging information, checking things off a list and using the links to download any missing software for testing. The learning experience is extremely hands-on in this way, and you don’t get bored of simply reading information off a screen.
The toolkit is best used in its printed form. Bonus points for those who laminate it and use dry erase markers, so it can be reused 🌱 and accessible by anyone in a team.

The toolkit at a glance. Available for download here.
First, read the General Information. This sheet contains details on conducting accessibility testing, what to focus on, how to prioritize testing, what tools* are needed before you begin, etc.
*Microsoft Inspect is a house favorite for digging into the code and checking the values for accessibility-related attributes.
Once you have everything set up, create your Action Plan. This is a sheet to document the task on hand — details on what you’re going to test, using what software, the order of testing (color, screen reader, keyboard, etc), deadlines, persons of contact. This will help create a methodology for future reference.
Then you move on to the Guides section. This has a short list of guides that are in the form of checklists to ensure the tester hits all the points to consider. There are 4 parts in the guide (for now), namely Keyboard, Text Alternatives, Screen Reader, Color/High Contrast.
Compliance Cards are the checkpoints for every single test. They contain the exact WCAG or Section 508 rules and code attributes whose values are noted if they are not set to the desired state. This is for the developers to reference and implement changes on. The back of these cards can be used to keep count of the defects found under each rule.

Compliance Cards
Testers are recommended to take notes in a format they feel is most comfortable to them. But be sure to include the following in your notes:
Defect description
Steps to reproduce it
Screenshots or videos to accurately explain defect
Team/person that would be responsible for correcting it
Empirical data or suggestion on desired output (comparing similar UI or workflow in different kind of desktop app)
Conclusion
Accessibility for all types of software applications is important, not just web. When I was struggling to learn about desktop accessibility, I didn’t have many places to go to — but I am happy to help anyone that wants to learn more about it. Hopefully this is a drop in the ocean and will start more discussions around it. Disclaimer: I am not an expert, and this is not an exhaustive toolkit. I intend to keep growing it and adding more checkpoints to it. If you would like to learn more about this toolkit, or want to share your own practices with me, please get in touch!